
Want to go lighter — maybe a trendy blonde, a bold pastel, or just lighten your natural colour? Hair bleaching can be a game-changer, but it’s also one of those beauty processes where preparation and care matter just as much as the final look. Do it right, and your hair can turn heads. Do it carelessly, and you’ll be dealing with dryness, breakage, and regret. Here’s how to approach bleaching the smart way.
- What Hair Bleach Does (and Why It Works)
- Before You Start: Get Your Hair Ready
- What You’ll Need for Bleaching
- Step-by-Step Bleaching at Home
- Step 1: Protect Your Skin
- Step 2: Section Your Hair
- Step 3: Mix the Bleach
- Step 4: Apply Bleach Bottom-Up
- Step 5: Time It
- Step 6: Rinse and Condition
- Natural Alternatives (Gentler but Slower)
- Side Effects to Watch Out For
- Keeping Your Hair Healthy After Bleach
What Hair Bleach Does (and Why It Works)

Hair bleach isn’t just “lightening your hair.” It’s a chemical process that strips pigment — the melanin — out of your strands. The bleach breaks down melanin molecules deep inside the hair shaft, turning darker tones into lighter ones. The longer the bleach stays on, the lighter your hair will go, but more time also means more potential for damage, so balance is key.
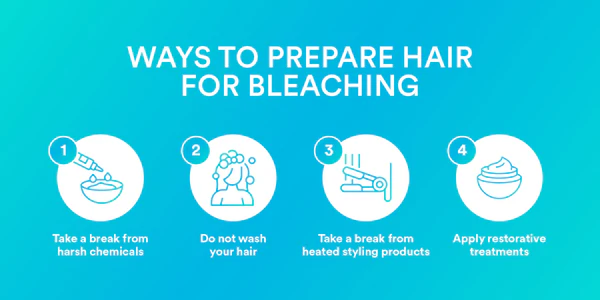
Before You Start: Get Your Hair Ready
Bleaching isn’t something you want to rush into — especially if your hair has been chemically treated recently.
1. Take a Break from Chemicals
If you’ve coloured your hair or used other chemical treatments in the last few months, give it a rest. Freshly treated hair is more fragile, and bleaching on top of it can lead to breakage. Experts often recommend a few months gap at minimum before bleaching.
2. Deep Condition and Hydrate
Dry, brittle hair and bleach are a bad mix. Start deep-conditioning treatments at least two weeks before bleaching, and always follow up every shampoo with a good conditioner. Hair masks twice a week can make a noticeable difference.
3. Oil Your Hair
Natural oils like coconut or olive oil help add a protective layer and lock in moisture. If you can, massage oil into your scalp overnight before washing out in the morning.
What You’ll Need for Bleaching
Before you dive in, gather these essentials:
- A high-quality hair bleach kit
- Developer (volume depends on how light you want to go)
- Mixing bowl and tint brush
- Gloves and hair clips
- Neutralizing shampoo and conditioner
- A towel or old shirt — bleach stains don’t wash out easily
Bleach kits typically include a powder and you’ll mix it with a developer. Developers come in strengths like Vol 10, 20, 30, or 40 — higher numbers mean more lift, but also more potential damage.
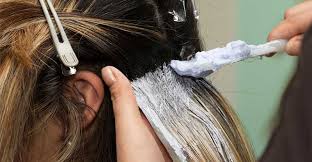
Step-by-Step Bleaching at Home
Bleaching takes time and patience — don’t rush.
Step 1: Protect Your Skin
Apply petroleum jelly around your hairline, ears, and neck to stop the bleach from irritating your skin. Always wear gloves.
Step 2: Section Your Hair
Divide hair into small, manageable sections with clips. Start at the nape and move up. This makes application even and prevents patchiness.
Step 3: Mix the Bleach
Follow the instructions exactly — usually 2 parts developer to 1 part bleach. Mix until smooth. No clumps!
Step 4: Apply Bleach Bottom-Up
Apply first to the mid-lengths and ends, then the roots (heat from your scalp makes roots lift faster).
Step 5: Time It
Cover your hair (shower caps help), and leave the bleach on for about 30–40 minutes, checking regularly. If you feel severe itching or burning, wash it out immediately and rinse well.
Step 6: Rinse and Condition
Rinse with lukewarm water, then shampoo with a neutralizing shampoo followed by a rich conditioner. Let air-dry for minimal stress.
Natural Alternatives (Gentler but Slower)
If you’re not in a rush or want to avoid harsh chemicals, there are some gentler methods you can try — though they work slowly and subtly:
- Lemon juice + water spray: Spray on hair, sit in sun for a couple hours, then wash.
- Apple cider vinegar + honey + coconut oil: Apply overnight and wash out.
- Chamomile tea rinse: Steep, cool, and apply to hair; repeat weekly.
These methods won’t bleach hair as dramatically as chemical bleach, but they can gently lighten tones over time.
Side Effects to Watch Out For
Bleaching can be tough on hair and scalp if you’re not careful:
- Hair may feel dry, brittle, or frizzy afterward.
- You might experience scalp irritation or stinging if skin gets exposed.
- Some hair loss or breakage is possible if hair is already weak.
If you notice intense burning, redness, or swelling, rinse immediately and consider a professional consult — those are warning signs it’s gone too far.
Keeping Your Hair Healthy After Bleach
Bleach doesn’t go away once it’s there — your care after matters just as much as the process itself.
1. Use Gentle, Sulphate-Free Products
Swap harsh chemicals for sulphate- and paraben-free shampoos and conditioners to preserve moisture.
2. Ditch Heat Styling
Straighteners, curlers, and daily blow-drying can dry out bleached strands further. Take break.
3. Oil and Deep Condition Regularly
Natural oils like coconut, olive, or sunflower help nourish and reduce breakage.
4. Hydrate Hair
Moisture is your best friend post-bleach — think quality conditioners and weekly hydrating masks.
Bleaching at home can be done, but it’s a delicate chemistry experiment with natural fibers as the subject. Preparation, timing, and aftercare are what turn a rough job into something you’ll love. For very thick or previously treated hair, or if you’re aiming for a dramatic lightening, visiting a professional stylist is a wise option.